Hands-on with Next.js’s Preview Mode

My name is Zsolt and I am a front-end engineer based in Hungary. 🇭🇺 I have a strong passion for learning in public and sharing my journey with the world. I am also an advocate of mental and physical health.
When it comes to bootstrapping side-projects, Next.js has been my go-to framework lately. It comes with several features out of the box — such as file-based routing, API routes, and automatic image optimisation — to streamline the development process.
Our today’s topic, Preview Mode is yet another remarkable feature. It's been around since v9.3 and was a nifty addition to my recipes warehouse.
In this article, I'll start off with a primer on what Preview Mode is, and then walk you through step-by-step how to set it up on your own. Thus, without further ado, let's get started!
What is Preview Mode?
Let’s take a simple blog as an example. Instead of editing markdown files locally, you opted for a headless CMS to facilitate content authoring. At build time, a request is sent to fetch the list of published blog posts and pre-render the page with them:
export async function getStaticProps() {
  const posts = await fetchBlogPosts();

  return {
    props: {
      posts
    }
  }
}
Easy-peasy. However, what if you wanted to preview draft posts, that is taking a final look at them before hitting the publish button? It wouldn't be ideal if you had to spin up the dev server. Preview Mode to the rescue!
When Preview Mode is turned on, Next.js bypasses static generation to on-demand render a page (aka SSR). As a result, getStaticProps will be called at request time as opposed to its normal behaviour.
And basically that's it. Don't worry if it doesn't make much sense yet, as a matter of fact it didn't make much sense to me either until I got my hands on it.
It’s time to switch over to the step-by-step guide to learn how to adopt Preview Mode.
Step One: Create a Preview API Route
Create a new API route under pages/api/ folder:
export default function handler(req, res) {
  // ...
}
Note that the name of the API route does not matter, it could be anything.
Step Two: Enable Preview Mode
export default function handler(req, res) {
  res.setPreviewData({});
}
By invoking res.setPreviewData({}), Next.js sets the __prerender_bypass and ___next_preview_data cookies on the browser.
Caveat
Make sure that the API route is called securely from your CMS! Explaining it is beyond the scope of this article, but fortunately Next.js has a separate chapter dedicated to it.
Step Three: Detect Preview Mode
getStaticProps recives the context parameter by default. When preview mode is turned on, the context.preview flag yields true:
export async function getStaticProps(context) {
  if (context.preview) {
    // …
  }
}
Step Four: Fetch Preview Data
Typically, CMSs offer a different API route to fetch draft content:
export async function getStaticProps(context) {
  If (context.preview) {
    const allPosts = await fetchAllBlogPosts();

    return {
      props: {
        allPosts
      }
    }
  }

  // ...
}
Step Five: Configure Custom Preview URLs (Optional)
This step largely depends on whether the headless CMS you're using supports setting custom preview URLs. For instance, Contentful offers a designated page:
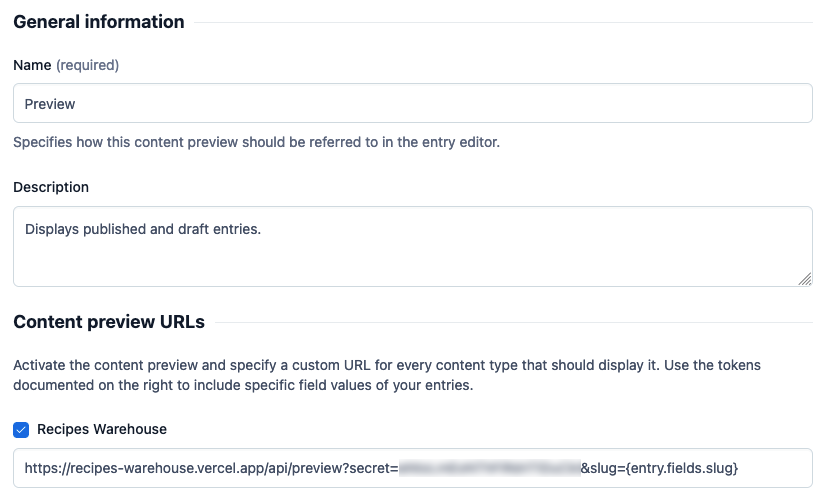
I'd like to draw your attention to the URL, to {entry.fields.slug} in particular. It's a placeholder that will be resolved to an actual value when the preview is opened.
If the headless CMS of your choice isn't capable of configuring custom preview URLs, you'll need to construct and access the URL manually.
Final Worlds
That's a wrap, folks. I hope I've enlightened you with some valuable information. Should you have any questions, let me know down below in the comments section.


